Wednesday, July 20, 2011

The Blue Bungalow Farm is moving!

The blog, that is. Not the actual farm.

For a while now I've been posting my reflections about urban homesteading at two locations: here and at Wauwatosa Now, where I'm a community blogger. From this point on, please read my posts only at the Blue Bungalow Farm blog at Tosa Now.

Thanks for visiting this page!

Tuesday, July 12, 2011

A Fishy Trip to the Beach

One of our favorite perks of life in the Milwaukee area is easy access to the shores of Lake Michigan. We moved here in 2006 from land-locked Champaign-Urbana and soon formed a habit of visiting the lake, sometimes daily, to dip our feet in the water at Bradford Beach or walk along the shore at Klode Park in Whitefish Bay in search of sea glass and cool rocks.

Despite our love of the gorgeous expanse of Lake Michigan shoreline, we rarely wade further than our knees into the great lake's waters. Very few locals swim in the ice cold lake – partly because, well, it's freezing, and partly because of the unimaginable things one might find in the water. Like blobs of algae, garbage, maybe human and pet waste (really). Never mind the unseen poisons in the water thanks to industrial dumping by BP in Indiana and others.

At a recent trip to a Milwaukee beach, we confronted all of the above pollutants – including pet waste (someone's unleashed dog trotted by and peed in the sand right in front of us). But the most memorable pollutants were dozens of shiny little fish baking on the shoreline.


When we first arrived, we found a decent spot in the sand and watched our three girls run to the icy water to wade. Almost immediately, one of them was able to catch a fish with her bare hands. She brought her prize to us and I suggested that she temporarily place the small silver fish in a plastic cup lying in the sand so she could study it (the cup was one of many pieces of trash laying on the beach). She placed the fish in the cup and watched it float, belly-up. "It looks dead," I said, wondering if the process of being captured was too much for the creature to handle. She dumped the fish into the water. Then, a few moments later, she caught another fish. And then another. "Why are these fish so easy to catch, and why do they all look half-dead?" my husband and I wondered. We speculated that the "living" fish our girls caught were sick and about to join their dead brethren on the shore.

Of course, given the local lore about Lake Michigan pollution, our first thought was that the fish were dying because of something in the water. We grew increasingly squeamish watching our girls play in what we assumed to be a polluted lake. The longer we sat, the more the odor of the dead fish, along with sea gull feces, overwhelmed us. To make matters worse, biting flies surrounded us. Then that dog trotted along and peed. The dog pee was the last straw. We packed up and moved our party to Alterra on the Lake.

We were perplexed for days about the dead fish, wondering what caused this phenomenon. Any time creatures die en masse, humans speculate. Were the fish deaths caused by industrial waste dumped into the water? By global climate change? Is it an omen? My overactive imagination gravitated toward the worst.

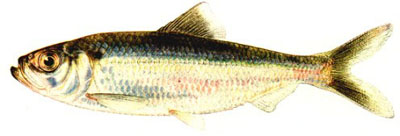
Then came an answer to why this seemingly mysterious phenomenon is occurring. We learned from a WISN report that the fish are called alewives (Alosa pseudoharengus), a smallish, invasive herring. According to the report, alewife deaths are common this time of year. The die-offs are probably caused by temperature fluctuations in the water. Still curious, I did some googling and found a few articles on the subject of the alewife die-off, including a recent piece by the Associated Press and WISN's web coverage. Both reports claim that the deaths are a normal phenomenon that occurs with this invasive species every so often.

But isn't Lake Michigan so polluted as to be deadly to some of its fish? This is a popular assumption on the part of many beach-goers, myself included. I asked the DNR's Southern Lake Michigan Fisheries Supervisor Bradley Eggold about pollution and whether it harmed the alewives. His answer? It is "very, very remote" that water pollution is a factor in the alewife deaths. "Alewives are very sensitive to changes in water temperature, especially at this time of year," he said. "These water temperature changes occur every year. Other major reasons why these alewives die-off every year include 1) they are native to the Atlantic Ocean and therefore live in saltwater. They can have trouble regulating their salt/water in their bodies, 2) spawning stress and 3) low food availability."

Harvey Bootsma, Associate Professor of the School of Freshwater Sciences at the University of Wisconsin-Milwaukee, agrees that pollution is "highly unlikely" to be a cause in alewife deaths. "This is a common occurrence on the great lakes, and it's almost always due to changing physical conditions in the early summer."

Temperature fluctuations, says Bootsma, are normal, and not necessarily caused by global climate change. "Alwives have been doing this ever since they entered the great lakes."

Regardless of what is causing the alewives to die, the fact remains that our beaches can sometimes feel as dirty as the nearby public restrooms (if you've been at the public restrooms by the lake shore on a busy summer day, you know what I mean). That goes for both the shoreline and the water itself. Although pollution may not be the cause of alewife deaths, it certainly contributed to an unpleasant beach experience. The amount of litter on the beach alone bordered on disgusting. All that filth on the shore made me wonder how clean the water is.

I asked Dr. Bootsma whether pollution in Lake Michigan is a problem. "The water itself is quite clean," Bootsma said. "There are some areas where there are localized problems, called 'areas of concern'. You can read more about them at http://www.great-lakes.net/envt/pollution/aoc.html." An Area of Concern (AOC), according to Environment Canada, "is a location that has experienced environmental degradation." This map indicates that in MKE the Milwaukee Estuary is an AOC, due to "significant contributions of toxic substances to the Milwaukee Estuary AOC from upstream sources" (e.g. the Menomonee River).

The bottom line is that it's fairly safe to swim in Lake Michigan water if you're not in an AOC – that is, if you can stand the cold. And it's probably not a big deal for kids to be catching half dead alewives in the water, as long as they're not handling the ones that have been dead for a while. But many of our beaches are filthy -- there's no doubt about it. The sand is littered with waste, as well as bacteria from the feces of abundant sea gulls who gorge themselves on our garbage.

What might we do about our filthy beaches and our AOCs? While some of these issues are perhaps too deeply rooted for us to change on an individual level, Bootsma suggests a few things average citizens might do to help clean up Lake Michigan: "1. Mercury comes from coal burning power plants and other industrial (and natural) sources…reducing energy consumption helps, and people should also be careful how they dispose of hazardous waste; 2. Some near-shore problems are caused by excessive phosphorus loading to the lake. Some of this comes from urban runoff, so if people apply fertilizer (or any herbicides or pesticides) to their lawns, they should do it sparingly. A video that highlights some of the work we have done in this area can be viewed at http://www.mefeedia.com/watch/29499314; 3. Water quality is sometimes affected by overflows of storm sewers or sanitary sewers, so water conservation methods (using rain barrels; disconnecting sump pump drains from the ditch) can be helpful; 4. Be careful about what we flush down the drain. Unused pharmaceuticals, chemicals, and paint should be disposed of properly; 5. One of our websites has more useful information on beach water quality: http://www.glwi.uwm.edu/documents/non-pointdweb.pdf."

Seems to me that the simplest thing any beach-goer can do is to pick up trash off the shore. That and avoid feeding the gulls.

Beyond these measures, the DNR's Bradley Eggolt says it can be helpful to get involved through education and activism. Educate yourself by seeking out a range of sources on these issues. Then look for opportunities to become active. "The best advice I can give is to get involved," Eggolt explained in a recent e-mail. "Whether it is because you are a beach goer and want clean beaches or you are a fisherman and you want to catch salmon and trout, read and learn about the issues and attend meetings where these things get discussed… It could be a local fishing club, environmental group, nature center, etc. With that said, you would not have to join a group or go to those meetings, just read and get involved in whatever way that person feels comfortable doing."

Saturday, July 2, 2011

Transitioning with the A/C

Today I caved and did something I've only done a few times over the last four years: I turned on my air conditioner. It's not particularly stifling according to the thermometer, but after 24 hours with a heat index in the mid-to-upper nineties, it was steamy inside my house. The six of us (including one 90-pound, long-haired dog) were starting to wilt.

This moment of weakness seems an especially grave sustainability sin because it occurred, unwittingly, during Power Down Week, when local sustainers are challenged to "make their carbon foot print as small as they can" from June 25 to July 3. The week concludes with Energy Independence Day at Gordon Park in the Riverwest neighborhood of MKE. I've been away from my computer a lot these last few weeks, working on various gardening projects, so I missed the Power Down announcements on Facebook and various e-mail lists.

Though using my A/C (especially during Power Down Week) may hurt my eco-cred, I don't feel too guilty about it. Why? Because to me, this is what transitioning to environmental sustainability is all about. I fear that for some, sustainability can become a "more radical than thou" sort of exercise, a kind of competition to see who can tough out a higher degree of energy independence. Don't get me wrong – the fewer fossil fuels a person uses, the better. And events like Power Down Week offer fun ways to raise awareness about the transition movement. But the extremism required to suffer through a heat wave without A/C doesn't come naturally to most Americans, who have been coddled by comfort and convenience for generations. Can those blessed with A/C realistically be expected to revert to nineteenth century discomfort overnight? Judging by the responses of many of my A/C-loving friends to the concept, I think not.

Enter the transition movement, a philosophy that emphasizes weaning oneself off of fossil fuels. This is the concept behind Transition U.S., which posits that "life with dramatically lower energy consumption is inevitable, and that it’s better to plan for it than to be taken by surprise." It seems clear that fossil fuels like oil and coal -- extremely potent sources of energy that have powered the pace of human progress over the last 150 years -- are unsustainable resources, especially at the rate we are using them. And yet, to a certain extent it is unrealistic to ask Americans to quit their fossil fuel addiction cold turkey. That might be possible for a radical minority, but not for the masses. With this in mind, should the more radical among us simply shake our heads sadly and wait out the end of the modern world in our wind-powered eco-villages? Or should we take the hands of our less willing friends and families and help them baby step toward sustainability?

Having many reluctant transitioners among my loved ones, I choose the latter option (though the former does have its appeal). That's one part of the reason I turned on the A/C today. Sure, part of it was because, after a sleepless night dousing my head in cold water every half hour, I reached such a point of overheating that I could not function normally. But instead of toughing it out until the cool air returned, as I've done in the past, I chose to use the perfectly good air conditioner I own, if just for a day or two. Doing so, I feel, helps keep me honest and human. It helps me to empathize with those who don't think they can lead more sustainable lives because they don't want to give up their creature comforts. It also helps me to strike a balance. I can enjoy the A/C when I really need it, while also turning it off as soon as the extreme heat passes.

To me, this is the essence of transitioning. The Transition movement is about using the resources we have more sparingly, more judiciously. It is about slowly adjusting to a slightly less comfortable existence. For me, transitioning means keeping the thermostat set at 63 to 67 degrees in the winter, instead of 75. It means mowing half my lawn with a manual "reel mower" and the other half with a gas-powered machine. It means using both rain barrel and municipal water to hydrate my gardens. And it means only turning on the A/C when there is a heat index above 95. Transitioning makes our conversion to energy independence slow but sustainable. It is a luxury we now have while energy is still relatively cheap and readily available.

Part of transitioning involves "powering down," a little bit at a time. Another part involves shifting from using fossil fuels to using sustainable energy sources. This can be difficult for those of us who lack the funds to purchase wind turbines or solar panels. Thankfully, we can support renewable energy to fuel our A/Cs, furnaces, lighting and appliances by participating in WE's Energy for Tomorrow program. For $10 a month, a household can help fund WE's use of renewable energy (biomass, hydroelectric, solar, and wind), reducing carbon dioxide emissions by 15,264 pounds annually (and reducing waste of limited fossil fuels). Our family just enrolled. We are thrilled to know that when we cave and power up instead of down, we're supporting renewable resources when we do so.

Want to learn more about the transition movement? Here are a few more resources you might find helpful:

Green Neighbor
Sign up for the Energy for Tomorrow program through the Green Neighbor website and get a $5 gift certificate to Alterra Coffee!

Sustainable Tosa

Transition Milwaukee

Wauwatosa Energy Committee

WPR interview with Patricia Benson, Board Member, Transition U.S.

Thursday, June 9, 2011

Vanishing Bees

Growing up, I was absolutely terrified of "bees," the name I used for a variety of tiny monsters with dreaded, piercing stingers and stripy yellow and black backs. I was destined to get stung, I reasoned, if one of them came near me. As a child I was always afraid of any creeping, crawling thing, but my exceptional fear of bees and wasps was sealed when I was about seven years old. One evening, I bolted outside the second the last bite of dinner was consumed so I could ride my bike in the waning hours of daylight. As I pulled my bike out of the garage, I unleashed the wrath of a yellow jacket. It chased me up the sidewalk until my hero arrived: Jack, the burly tough-guy next door, who lifted one gigantic work boot and smashed the creature underfoot.

I spent my entire childhood running in this manner from bees and their kin. While conventional wisdom holds that a person confronted by a bee should stand like a stone, lest flailing arms and screaming scare an insect into stinging behavior, I held firm to my own belief that running was a more effective evasion method. And it did work for me – over the three and a half decades of my life I have never been stung.

I held on to my fear of nearly all creatures of the order hymenoptera for a very long time. That fear worsened as I grew up and read books like A Taste of Blackberries, in which a young boy dies from an allergic reaction to bee stings. My grandma is allergic to bees, so I figured that I might be, too. All the more reason to flee on sight of any yellow-and-black-backed insect.
A few years later, I met my husband, a man with almost no fear of bees. He spent hours as a boy trying to capture them with honeyed jars and, unlike me, was able to distinguish between a honey bee and a yellow jacket wasp. When we were hiking and confronted a fuzzy bumble bee, he'd try to pet the thing. I later had three children by this man, and amazingly, they displayed the same bee-loving behavior. My firstborn daughter so loved the little creatures that she continued to try to capture them as pets, even after she was stung.

Having children who spent hours at play turning over rocks in search of arthropods piqued my own curiosity about all insects, including bees. So I bought an insect field guide and began to learn the difference between the "gentle giant" bumble bees and the aggressive hornets. I learned that the horrifying Ichneumon wasps with their excessively long stingers have no interest in humans (their "stingers" are actually ovipositors used to inject eggs into the insect prey they parasitize). The more I learned, the more my fear melted away. That fear was replaced by enchantment, curiosity, and fascination. My husband's macro-photos of insects, including various bees, helped me to see the beauty of their world. Here's one of his photos, of a bumble bee pollinating a flower:

Photographer: Steven T. Zydek

Soon, I became interested in honey bees in particular, due to their manifold virtues. Honey bees are amazing creatures. They are organized in a way that suggests high intelligence, though their human-like civilization is more innate than learned. Bees are crucial pollinators. Without them, many of our most prized fruits would not, well, come to fruition. And of course, bees provide us with delicious honey and fragrant, useful beeswax. The more educated I became about these creatures, the more I loved and respected them.

Naturally, then, I was disheartened to learn about the recent rise of what has been dubbed Colony Collapse Disorder. Honey bees, it seems, are disappearing. CCD is a mysterious and potentially disastrous dilemma. Bees aren't simply dying overnight, leaving their corpses in mounds around their hives. If this were the case, perhaps it would be easier to trace the source of the problem. Instead, worker bees – the small female honey bees that collect pollen to feed their young and care for the queen -- are simply disappearing, flying off in confusion and dying when they can't find their way back to the hive. The disappearance of workers ultimately causes a hive to collapse over a span of a few months.

Many theories have been bandied about as to why the bees are disappearing, from climate change to cell phone radiation to industrial beekeeping methods and even supernatural phenomena. A couple weeks ago a study was released that again pointed the finger at cell phones as the culprit, indicating that their signals are confusing and killing bees. So stated this article shared across social media.

But cell phones are not the real cause of CCD, say beekeepers interviewed in Vanishing of the Bees. We recently viewed a screening of the documentary at Unity Church in Wauwatosa. The film largely blamesneonicotinoid pesticides as the cause of CCD. These chemicals work not by being sprayed on the leaves of crops, but within the system of the plant (hence the name "systemic pesticide"). Theorists point to treated plants as having a detrimental effect on bees, who do not die instantly after exposure but bring tainted pollen back to the hive. Over time, larval bees, who have been reared on toxic pollen, grow up confused and disoriented and are eventually incapable of leaving the hive without wandering too far and dying.
Abroad, some beekeepers and apiarists are so certain of the link between systemic pesticides and CCD that they have worked to successfully ban neonicotinoids. Cf.http://www.epa.gov/opp00001/about/intheworks/ccd-european-ban.html and http://www.bayer-kills-bees.com/.

In the U.S., the Environmental Protection Agency will not take a strong stance against neonicotinoids as the cause of CCD. They say research isn't conclusive enough to institute a ban. Why? According to the film, studies conducted by chemical companies stating that neonicotinoids were not harmful to bees (adult bees did not die within a few days of exposure to these pesticides) were submitted to and accepted by the EPA as proof that these pesticides are not causing CCD. Here's the EPA's statement on the issue.

Whatever the cause, if CCD continues it may have a devastating impact on humans, as well as bees. According to the film, bees are required to pollinate a third of the food we eat, from fruits to tree nuts and many things in between. Without ample honey bees, farmers are required to ship bees out of state to do the pollinating of select food crops, causing food prices to rise. Without any bees, we will simply not be able to enjoy many fruits, nuts, and seeds. Can you imagine a world without apples? Pumpkins? Sunflowers? It boggles the mind to think of the impact of the death of honey bees. In addition to the threat to many of our staple foods, Colony Collapse Disorder is perhaps symptomatic of environmental toxicity that is bound to have an effect on all life – human included.

What can be done to stop the death of bees? Until the cause of CCD is determined, it may be difficult to completely eradicate the problem on the residential level. That said, there are things any citizen can do to help protect bees. Find (or host) a screening of a documentary like 'Vanishing of the Bees' or the similar film Queen of the Sun. Plant bee-friendly plants in your yard, like sunflowers, pumpkins, and bee balm (Monarda). Cease from killing dandelions and clover in your grass – they are important food sources for pollinators like honey bees. Commit to keeping your yard chemical-free. Don't fear honey bees – they help us survive and make the world a beautiful and healthy place. They rarely sting humans unless bothered. Take a beekeeping class through the University of Wisconsin Extension's Urban Apiculture Institute. Lobby the government and the EPA to work harder toward finding the cause of CCD.

Finally, and perhaps most importantly, educate yourself about insects. Know your bee and wasp varieties and avoid killing honey bees (if you see a swarm, DO NOT spray it with pesticides – most people fail to realize that bees are at their most tame when they are swarming. Call a local beekeeper and he or she will collect the bees for you). As citizens we have to stop believing the hype about "bugs" and learn to tell the difference between beneficial insects (without whom would mean certain death for humans) and true "pests."

Here are a few more bee-related resources:


Wednesday, May 25, 2011

Accidental Hot Composting

In my last blog post, I shared some of my knowledge about composting in honor of International Compost Awareness Week. I began composting in 1999, when I bought my first bin (something along the lines of this). Composters like my first bin are often touted as a way to achieve "hot composting" – the black plastic container absorbs heat, or so the ad copy goes, thus encouraging organic waste to "cook" into rich black compost.

As I explained in the aforementioned blog post, hot composting occurs when wastes rich in carbon and nitrogen are mixed in the right proportions (30 C : 1 N). A few scoops of soil or finished compost (for the microorganisms within) are thrown into the mix. The pile is kept moist and well-aerated and, if one is lucky, the bacteria in the pile will begin to consume like maniacs. They eat and breed in such a frenzied manner that they generate heat in the process. This heat is a sign that waste is breaking down rapidly.

I have no idea if my first compost bin really worked – sure, the waste I put inside broke down, but when I tried to remove it a year later the receptacle fell apart, and I never really found out if the compost heated. This is consistent with stories I’ve heard from other gardeners who have invested in expensive plastic composters only to find they broke or collapsed after a year or two of use. While not all of these bins bust so quickly, they can fail to deliver in their promises to cause the kind of heating that creates crumbly black "Gardeners' Gold" within three months’ time.

A few years after my disappointing first run with hot composting I opted to try passive composting. With passive composting, you basically throw stuff in a pile and let it rot for a year. You don't aerate by turning the pile, nor do you water the pile; you simply let nature take its course and enjoy a small amount of compost each spring. In 2003, my father-in-law built me a two-sided bin with an open top, removable wooden slats in the front, and chicken wire sides. I've been passively composting ever since, harvesting compost once a year.

That is, until about two weeks ago. That's when, despite the cold and rain, I discovered that my “passive” pile out back had accidentally become a hot pile – so hot, in fact, that it has been steaming for over a week. Here's a photo in which I almost captured the faint vapor rising one cold morning when I dug into the pile:


A hot compost pile is desirable because (A) heating causes compost to form much faster – it only takes about three months; (B) the quality of the compost is higher because of all the additional microbial activity encouraged; and (C) weed seeds and pathogens are "cooked" through the pasteurization process that takes place in the pile.

Accomplishing hot composting can be tricky. Most believe they fail to generate heat because their pile isn’t getting enough sun or warmth, though my case is proof that these variables have little to do with hot composting. My pile is in a shady spot in the back of my yard, next to an ash tree. The day I first found it steaming it was about 45 degrees Fahrenheit, extremely windy, and overcast. Not exactly the scorching day you'd expect would cause yard waste to heat. Nor is my bin made of heat-absorbing black plastic, which many companies claim is an important factor in successful hot composting (cf. this model, which advertises that "this high-performance tumbler is made of 100% recycled plastic in a heat-absorbing black color which helps compost 'cook'").

I'm not 100 percent sure what I did to cause my pile to heat, but I do have some theories:

(1) The pile is big. The whole thing is at least 3’x 3’x 3’. I'm not sure if it's absolutely necessary to have a big pile in order to achieve hot composting, but it certainly helps, for two reasons: one, the greater the variety of waste I throw on the pile, the more I increase the likelihood of balancing nitrogen to carbon, and two, the more waste, the more for the microbes to eat. I currently throw any and everything I can compost into the bin, from yard waste to kitchen scraps (my own and those I’ve collected from neighbors and, occasionally, local restaurants). I throw in large amounts of dried weeds and dead leaves from the yard (for the carbon) as well as buckets of moist, nitrogen-rich kitchen scraps. This helps me get closer to striking that important carbon to nitrogen balance of 30:1.

(2) The pile has LOTS of sticks in it. In the past I omitted the sticks, as they take a very long time to break down and are a pain to pick out of my passive pile once a year. HOWEVER, I learned in my Master Composter class that sticks, because of their size, create necessary pathways in the pile for air. So I allowed a number of sticks of various sizes into the pile, which I believe helped to aerate it, thus reducing the need for turning (something I seldom do).

(3) The pile is very moist due to ample rain. One of the main reasons folks’ piles don’t' heat is because they dry out, especially mid-to-late summer. Compost piles need to be watered when it's not raining – especially if they contain a lot of carbon-rich materials like dead leaves. It has been raining a lot this spring – which has limited the amount of time I’ve been able to spend in the garden, but has worked wonders on my compost pile.

Of course, my happy composting accident has me revved up to try intentionally hot composting. So lately I've been checking the pile daily and have even started turning it with a pitch fork. It’s so fun to see all the black crumbly compost steaming in the center of the pile. If my hot pile keeps working so well I’m sure I’m going to have compost by mid-summer, which will offer a nice pick-me-up for the veggies and herbs growing in my raised beds.

Do you have a question about composting or a composting success to share? E-mail me at gardensnotgarbage@gmail.com or leave a comment below. Or, stop by the Tosa Farmers Market on Saturday, May 28 at 11 a.m. and learn about composting basics at the Historic Little Red Store (7720 Harwood Avenue).

Thursday, May 5, 2011

Do You Compost?

If your answer is yes, you have my permission to skip reading this blog post.

If your answer is no, I'd like to make a special appeal to you: consider engaging in the simple, delightful process of turning organic "waste" into the resource it really is. This is International Compost Awareness Week, and in honor of the event, I'd like to challenge you to make a bold move to cease throwing kitchen scraps into the trash and instead give composting a try. In doing so you'll discover for yourself how magical (and how easy!) the act of composting can be.

Composting is magical because it takes garbage and turns it into a useable product – compost, also known as "humus." Humus is a crucial but often lacking component of healthy soil. Adding compost to the earth reduces the need for commercial soil amendments, as well as manufactured chemical fertilizers that can run off our properties and into the rivers and lakes, polluting our water supply. Compost adds nutrients and micronutrients to depleted soil, helps soils retain moisture, and reduces erosion. This allows us to grow healthier plants, from vegetables and fruits to native flowers and even grass. It can act as mulch and side dressing and can be used to make "compost tea." Compost can be purchased, of course, but it is virtually free, after start-up expenses, once you begin converting your own kitchen waste into this natural resource.

And composting really IS easy. There are three main ways to compost -- choose your favorite. The bottom line is that anything you do to return resources to the soil, rather than send them to the landfill, is an important contribution to environmental sustainability.

The first method of composting I'm going to discuss is probably the most well-known. Hot composting is a technique whereby your aim is to "cook" your vegetable-based waste. Food scraps heat and thus break down faster into compost. Contrary to popular opinion, a pile doesn't necessarily heat because of the sun or summer temperatures. It heats when beneficial composting bacteria go to work inside a pile, heating it to degrees upwards of 160 F. This pasteurizes the pile and creates high quality compost quickly – the total turn-around time is about three months when a pile properly heats.

While this is a fantastic composting method, it can be tricky to get a pile to heat. Heating requires a carbon to nitrogen ratio of 30:1 in the waste. Carbon rich materials include things like dead leaves and hay. Nitrogen rich materials include fresh-cut grass, vegetable scraps, or manure. Many say a good rule of thumb is to mix two parts carbon-rich "brown" materials with one part nitrogen-rich "green" materials. In order to heat, the pile also needs to be adequately moist (about as wet as a wrung-out sponge) and it needs to good oxygen flow – aeration is encouraged through regular turning of the pile.

Sounds fun, doesn't it?

Um….sort of? I know I don't have time to do all these things. I would, of course, LOVE to see my big ol' pile out back get so hot it steams, but I know accomplishing this is no small task.

An alternative is what is called "passive" or "cool" composting. This is the outdoor composting method of choice for those who are extremely busy – or just plain lazy. I think I may have one foot in each of those categories, which is why this method works so well for me. The main difference between hot and passive composting is the amount of work that goes into it – and the amount of time it takes to create usable compost. For my pile, I simply dump waste into the bin. I try to layer the types of waste I add – for example, if I dump in nitrogen-rich veggie and fruit scraps I will cover them with carbon-rich dead leaves. I do this to help the carbon-nitrogen balance and to cover any offensive-smelling waste that might attract flies. Occasionally I will also turn the pile, although I admit I don't do it often enough to call it "hot" composting.

Interestingly, right now my pile is so big that it seems to be heating, despite my laziness. If it heats, it will compost faster. Otherwise, the compost from a passive pile is typically ready in six to twelve months. I usually harvest compost in late spring, just as I'm preparing my vegetable beds.

One caution: if you choose passive composting, avoid adding weed seeds to your pile. Though most weed seeds will be destroyed by heating, without the heat the seeds may survive the composting process and end up sprouting in your gardens.

The third method is worm composting, AKA vermicomposting. I've written about in the past on this blogand I own a small vermicomposting supply business; I encourage you to peruse those resources if you want to learn more. Vermicomposting is my favorite composting method, simply because it's fast, can be done indoors year-round, and produces a superior compost that plants love. Worm composting creates finished compost in approximately two to four months.

With all three methods, avoid adding meat, fish, poultry, dairy, and other animal products, as these wastes create offensive odors and can attract pests. Also avoid adding heavily processed and salty foods, charcoal briquettes and ashes, and dog and cat feces. Paper products are OK – throw those coffee filters and paper towels in with your fruit and vegetable waste. They'll break down quickly in a compost bin of any kind.

As for composting systems, you can invest in an expensive commercial compost bin, and if you want to do this, more power to you. Just make sure you read as many user ratings as possible before spending money so you have an idea of what to expect. Of course, you do not have to buy an expensive commercial bin to compost. There are plenty of plans for bins, ranging from a simple cylinder made of chicken wire to more complex wooden systems. You can also use concrete blocks to build bins. The Wisconsin DNR has a nice site with composting resources, including info on types of home composting bins. Check it out.

My passive bin is made from scrap wood and chicken wire, which allows for decent air flow around the pile. Wooden slats in the front slide up and out when the time comes to remove the compost. The two sides allow me to focus on adding waste to one side at a time; when the first side is ready, I remove any unfinished materials and place them in the other side, then begin adding new waste to the second side.


If you are unable to compost yourself, you may be able to find a neighbor to help you. I use my large bin to help neighbors compost. I also feed neighbors' waste to the thousands of red wiggler worms that eat garbage in my basement.

If you can't find a neighbor to help you compost, locate a community composting collective, like the Milwaukee Community Compost Network. Or, start a collective yourself.

If you have a big composting bin and not enough waste to fill it, you might consider offering to compost for your neighbors. You can also try to compost for local restaurants and grocers. There are many possibilities for composting. By working together, every community can turn their garbage into gardens!

Tuesday, April 19, 2011

The Joys of Nurturing Baby Plants

Every spring for the last three years I've started my own vegetable and herb seeds indoors. This year, I spent about half of the last day of March mixing growing media, prepping flats, and planting seeds. Two flats of broccoli, cabbage, cauliflower, and lettuce are now growing in my cold basement under lights. Eight flats of tomatoes, eggplant, basil, peppers, and other heat-loving plants are in a mini-greenhouse that sits in front of my eastern-facing sliding glass doors in the kitchen.


In about one week I’m going to plant two more flats of seeds: pumpkins and sunflowers. I start these large, fast-growing plants indoors, even though the package directions say to sow them outside after the last frost. Why? I’ve heard slightly older sunflower seedlings, for example, don't taste as good to rabbits when they are a little less tender. By starting them indoors, away from hungry herbivores, and then transplanting them after the last frost, the critters tend to leave them alone.

The seed starter mix I use is based on the following recipe, inspired by Gayla Trail of You Grow Girl:

Combine equal parts of:
- peat moss OR shredded coconut fiber (I alternated between the two – both retain moisture; peat moss provides nutrition)
- vermiculite (ground up mica; expands and holds moisture)
- perlite (exploded volcanic rock; provides aeration)

I filled a five-gallon bucket with this recipe; at the end I threw in about a quart of worm compost. According to You Grow Girl, seeds don't need fertilizer until they've sprouted their second set of leaves (the first set of "true leaves"). A peat-vermiculite-perlite mix doesn't contain much nutrition for plants; it is ideal for seed starting because it is light and friable, but once the energy contained in the seeds is used up by the sprouting process, plant nutrients will need to be added by way of fertilizer and/or soil amendment. Hence the addition of worm compost: adding compost gives seedlings a little food in case they need it before I get around to adding extra nutrition.

My 10-year-old daughter and I filled paper-based egg cartons I've saved over the last year with our homemade seed starter mix. We planted seeds in each carton and then placed the cartons in plastic flats.


I water by filling the bottom of the flats and letting the cardboard egg cartons soak up the liquid. This is preferable to watering from the top, which can be disruptive to the plants.

Seedlings are a joy, but they require work. Each morning I check on them – I make sure they are constantly moist and turn them toward the light if they are leaning too much. I keep a look out for mold in the greenhouse, which can grow if it becomes too humid inside. I thin out weaker plants. This allows selected seedlings to grow stronger, as they won’t have to compete as much for soil nutrition. (One tip I picked up somewhere along the way is to thin seedlings with scissors. Cutting off unwanted seedlings at the base of their stems, instead of pulling them up by the roots, can be less disruptive to the roots of the seedlings you want to keep).

Soon the seedlings will be far too large for the little egg-shaped pots in which they are currently stretching out their roots. So around the time I plant my pumpkin and sunflower seeds I will also transplant my other seedlings into larger pots – anything from reused 4” pots from old plant purchases to repurposed plastic food containers with drainage holes poked in the bottom. My biggest problem at transplant time will be figuring out how to make room for the bigger pots. Space in the mini-greenhouse is limited, so I will have to choose the strongest seedlings and discard the rest. It is so hard for me, though, to destroy viable seedlings, so I typically end up saving way more of them than I should. I squeeze extras into a second greenhouse I put up in my dining room window.

In early May it will be time to harden off my tender babies: when the danger of frost has passed, I will give my seedlings time to adjust to the wind and sun outdoors by placing them in a shady spot for a few hours each day. Then I’ll bring them in at night. This will continue for a few days, until they are strong enough to be planted outdoors.

Why do gardeners go to all this trouble to keep these tender baby plants alive indoors? Part of it is frugality: a packet of seeds costs only a couple bucks; from one seed packet you can conceivably end up with dozens of plants that would be far more expensive if purchased as seedlings. But there’s much more to this process than saving money. After all, time is money, isn’t it? Nurturing seedlings does require an investment of time.

So it’s really not just about saving money – not for me, anyway. What started as an exercise in frugality has become a worthy spiritual endeavor. As seeds grow, I am able to observe and participate in the mystery of life. I nurture and serve these tiny, vulnerable creatures; they will eventually come to serve and sustain me when I harvest and consume their fruits. In their death they will bring forth new life when the remnants of their fruits are composted and used as food for a new generation of plants.

This process is precious and sacred, and I enjoy every second of it.

Monday, March 28, 2011

More on Grow Lights

You may recall that a while back I posted an article on growing plants indoors under lights. The article recommended eschewing the purchase of expensive grow light systems and instead growing under simple two-bulb workshop ballasts, each with one soft and one cool white fluorescent bulb. These two inexpensive, readily available bulb types have just the right kind of light to stimulate plant growth.

After posting Read This Before You Buy Grow Lights, I received a couple of responses to the post, mostly from commercial vendors of grow lights of various types. I found one of those messages intriguing because it presented a concept entirely foreign to me: growing under LEDs (Light-emitting Diodes). Here's the letter sent by Alex McQuown, Research Director of EcogroLED in Riverside, CA:

"Hi Heather, I read your grow light article and I thought I'd give you a few bits of clarification.

"Fluorescent lamps are actually a pretty poor choice for indoor gardening. The output maintenance for the bulbs is rather dismal (as is the lifespan of any electrode-based lamp,) the heavy amounts of green light actually interfere with some aspects of plant cellular division and maturation, and the phosphors are not hitting optimal chlorophyll absorption peaks (two in red and two in blue, plus another huge photomorphogenic peak in the UVB range and potentially a peak in the IR range.) Also, due to the low efficiency of fluorescent lamps (approximately 17%) a ton of energy is wasted.

"You'll be forced to change those bulbs out almost every year to maintain the brightest output possible. Canopy penetration is pretty dismal as well, with a typical T8 lamp only being as intense as the sun almost literally on top of the bulb - this means the usable photon flux density is within a very short range - about 8 inches from the light is the maximum usable distance before the umol level drops below usable densities.

"For just over a hundred bucks you could buy a 50w LED system that would've covered that entire setup, plus increased your productivity several times over, you'd (practically) never have to worry about replacement, and the coverage is out of this world….

"You should consider LED lighting."

* * * * *

Unsure of how to respond, I forwarded McQuown's message to my UW-Extension Master Gardener Training instructor, Sharon Morrisey, who serves as a Consumer Horticulture Agent for the Extension. She was the one who taught us Master Gardeners-in-training that expensive grow lights aren't necessary for growing indoors. Morrisey, too, was unfamiliar with using LEDs as grow lights, so she communicated with her fellow "co-horts" at the Extension. UW-EX greenhouse manager Johanna Oosterwyk responded: she doesn't recommend LED grow lights for hobbyists, though she agreed with McQuown that LEDs are more efficient at the commercial level. Here's Oosterwyk's response:

"[McQuown] is right on several counts. An LED fixture is more efficient and can produce a better growth response than a traditional fluorescent, incandescent or HID fixture. There are two reasons for this. First, the energy efficiency of LEDs is well established -- you get considerably more light energy per watt of electrical energy. Second, although individual LEDs are small and their output is moderate, they emit light in a very narrow wavelength. Manufacturers use this as an advantage by wiring together an array of LEDs that emit in the wavelengths that plants absorb best (red and blue). As you guys remember from class, both blue and red are needed for specific development responses (germination and flowering respectively). So not only is efficiency increased in production it's increased in absorption and use as well.

"However, I would still not recommend them to hobby growers. The initial costs are too high (though coming down) and for houseplants you just don't need that kind of radiation output. In addition, though you won't find yourself replacing bulbs every few years, when you do have to replace LEDs you will have to replace the entire fixture (or at least the entire light array), not just a single LED. They are all wired together on an electrical board so it is not a simple matter to swap one out. LEDs are supposed to be long-lived, but their lifespan can be greatly reduced by over-heating, so an effective cooling mechanism is essential or you will be replacing your fixture long before the 50000 hours he cites.

"Also, I don't know anything about the quality of [EcogroLED]; for a comparable product look here: www.lumigrow.com...

"LED growth fixtures are new enough that manufacturers are still working out the bugs. Which LEDs are best? In what combinations? Does the housing keep them cool enough? It will be interesting to watch them develop and in the next 5-10 years. Maybe we will be recommending them to hobbyists. There's a large study being undertaken by several universities and Orbital Technologies of Madison (former students of UW Hort Prof Ted Tibbits) more info here."

* * * * *

Did you get all that? I know. It's pretty complicated stuff. The bottom line, I think, is that the two-fluorescent bulb approach works fine for those wishing to give a few flats of veggie seeds a head start indoors in early spring. For anecdotal proof of this, check out the progress of my two flats of lettuce started in mid-winter. This is how my "Pablo Lettuce" seedlings looked on January 28:


And here they are now (see flat on far left):


I've already harvested some of this lettuce and it tastes great!

Wednesday, March 9, 2011

Where do your seeds come from?

In early March, gardeners begin planning which seeds to purchase for spring vegetable gardens. Seed companies know this, so around this time seed catalogs start appearing in our mailboxes. One of the catalogs I've been receiving for a few years comes from Gurney's, located in Ohio. I'm also on their e-mail list, so I frequently receive special offers, sometimes daily.

Around the same time my last Gurney's catalog arrived, I also received an unsolicited catalog from a company called Henry Field's. So I thought I'd do a little comparison shopping by reading the catalogs side-by-side. I figured this would help me compare the two companies’ products and prices.

That was when I noticed something strange: I discovered many identical products in both catalogs. For example, I noticed that "Rainbow Carrots" were in both catalogs, with the same picture (flipped in one). This seemed off, but it wasn’t exactly shocking – many companies purchase seeds from the same wholesaler, right? No big deal.

Then, a few days later I received two seemingly urgent e-mail messages about major discounts at both Gurney's and another nursery I’ve ordered from in the past, Michigan Bulb Company. Both e-mails were formatted in the same way. Out of curiosity I read the fine print on each message. Turns out they are owned by the same company – Scarlet Tanager LLC.

Out of curiosity, I googled "Scarlet Tanager LLC" and came upon this fascinating piece, reprinted from Countryside Magazine.

According to this article, many seed companies are owned by umbrella corporations like Scarlet Tanager LLC (an organization that, quite interestingly, doesn't seem to have its own website). These companies owned by Scarlet Tanager give the illusion of small and local – when you buy from Michigan Bulb Company, for example, you might imagine that your seeds come from a family farm in Michigan. In actuality, as reported in this piece, most of the seeds sold by these companies are purchased at the lowest price possible from mega-corporations like Monsanto. Monsanto, as you may know, has gained notoriety after being exposed by documentaries like Food, Inc. and King Corn. These films and many others have accused Monsanto of patenting and therefore controlling their own genetically modified seeds, making it illegal for small farmers to save seeds from patented varieties. [Incidentally, Monsanto crafted a response to the claims made in Food, Inc. I’ll let you be the judge of whether Monsanto has a right to sue small farmers for saving patented seeds].

What I’ve learned from this experience is that one must be very careful when assuming that seemingly local, family-owned farms aren't connected to Monsanto. Take, for example, the Wisconsin-based Jung Seed Company. Many assume that Jung is a local family company and therefore worth supporting in the fight against GMO foods. I looked into the matter of who owns Jung and the answer is somewhat complex, but it does seem that there is a Monsanto connection. The company that was originally owned by J.W. Jung was later split into two groups – Jungs Garden Centers and Jung Seed Genetics, which is owned by Monsanto. Cf. this discussion thread at seedsavers.org.

To be fair, I've bought products from companies like Jung, Gurneys and Michigan Bulb in the past and have been satisfied with their products (with a few notable exceptions, like the "bare root" hazelnut shrubs from Gurneys that turned out to be complete duds). The tri-color butterfly bush, the Nanking cherry shrubs, the dwarf fruit trees – they have all been quite successful. However, I wonder, what is the true cost of buying these cheap frankenplants? Am I unwittingly supporting genetic modification, corporate patenting of life and the demise of seed saving by purchasing from these companies? These are questions I am now pondering as I prepare to purchase seeds for the 2011 season.

Where do your seeds come from? Do you make a point of buying only locally-grown, unpatented seeds? If so, who are your favorite local growers and seed sellers? Do you participate in a local seed exchange? Do you save your own seeds? Or do you simply buy seeds of those who offer the most interesting varieties at the lowest prices, regardless of who's selling them? Weigh in by leaving a comment below.

From this point forward, it is my personal goal to stick to buying only heirloom varieties of seeds (which are not patented or genetically modified) and/or purchasing from companies that have taken a stance against GMOs and patents. If you would like to do the same, you may find this list helpful (use the search function to quickly locate Wisconsin vendors on the list). Or, join the Seed Savers Exchange,like I did,and get discounts on rare heirloom seeds http://www.seedsavers.org/.

Monday, February 21, 2011

Touring the Food Revolution

Yesterday I took my three girls to Sweet Water Organics for a tour of their facility at 2151 South Robinson Avenue in Milwaukee. Sweet Water is an indoor urban fish and vegetable farm in operation since 2008. I've been following their progress over the last couple of years and figured it was time to check the place out. Tours are $10 and absolutely worth the money if you have any interest in learning about pioneering sustainable agricultural practices occurring right here in Milwaukee.

Sweet Water is a fascinating project that brings the aquaponics system made famous in recent history by Growing Power's Will Allen to a repurposed industrial building on Milwaukee's south side. Aquaponics involves creating a growth cycle whereby fish like Tilapia and Perch are farmed in tanks; the waste they create is used to fertilize edible plants like lettuce, wheat grass, watercress, sprouts, and so on. This is an organic, sustainable growing method with the potential to revolutionize the food industry.

On our tour we congregated in a classroom and heard the back story of Milwaukee's aquaponics revolution from former Growing Power board member, Sweet Water co-founder, and local food revolutionary James Godsil, AKA "Olde." Following the lecture we were able to explore Sweet Water's aquaponics system. My three young daughters helped feed the fish. We then heard all about the science behind the aquaponics method. Following our aquaponics lesson was a Q + A period that was still going when I had to leave (my daughters started getting antsy). We were there for at least an hour and a half.

Sweet Water tours are every Wednesday at 6 p.m. and Sunday at Noon; children under 10 are free. Growing Power (located on the north side of Milwaukee) gives daily tours at 1 p.m.

Learn more about Sweet Water Organics at www.sweetwater-organic.com.

Friday, February 11, 2011

The Wonder of Worms

This weekend I'm giving a vermicomposting workshop to our neighborhood garden club. It's the first workshop I've ever done on the subject and I'm thrilled to be able to share my knowledge of this unique practice with others. In case you're unfamiliar, vermicomposting is a special way to return the nutrients in vegetable waste to the soil. It involves keeping earthworms indoors, using them to eat coffee grounds, apple cores, carrot peelings, and other waste. They eat kitchen scraps and turn this "garbage" into a rich natural fertilizer.

My interest in vermicomposting began several years ago, when I began hearing that folks were keeping "pet worms" in boxes in their homes and using them to compost. I was fascinated by the idea of having a little composting factory right in my house. So one day I decided to give vermicomposting a try. I did some research and built my own bin using an 18-gallon plastic storage tote. I bought several containers of red wiggler worms from a local bait shop, dumped them into the bin atop moistened newspaper strips, and began my vermicomposting adventure.

Truth be told, my first couple of years experimenting with worms were rocky. All went well with my first bin until I started noticing tiny fungus gnats all over the place. Frustrated with the pests, I moved the bin outdoors, buried the too-moist, nitrogen-rich bin contents with with dry, carbon-rich materials, and left the bin alone for a spell – a very long spell. In fact, I left the bin outside all the way through the winter. When I returned to the bin in the spring, I had a container full of lovely compost, but no worms! It was then that I learned the hard lesson that worms cannot survive above ground outdoors during a Wisconsin winter.

Determined not to give up, that spring I started a new bin, this time with a bucket of worms from Growing Power in Milwaukee. As I started to get the hang of vermicomposting I soon added a second bin. Then a third. Then I started building bins for friends and family. I'm now at the point where I'm so into vermicomposting that I just launched a little side business called Gardens, not garbage! to help others establish their own worm bins. I also hope to continue to give workshops in the area. Vermicomposting is a fabulous way to reduce waste while creating an amazing organic fertilizer in the process. If you do it right it doesn't smell and works like magic.

The best perk of vermicomposting, for a gardener like myself, is being able to use vermicompost to revive tired houseplants. I brewed up some "vermicompost tea" about a week ago using this method. Before using the tea to water and fertilizer my houseplants (everything from dracaena to dwarf pomegranates, figs, and coffee plants) I decided to try something I recently learned about in my Master Gardener class: I gave my houseplants a shower. I took all my houseplants and put them in my two bathtubs, then rinsed them with warm water, cleaning dust from their leaves (excessive dust can inhibit photosynthesis). After rinsing the leaves and soil thoroughly, I allowed the water to soak through the pots, washing away the build-up of salts that can occur in the average houseplant pot due to treated water. After their bath, I poured my brew of compost tea on the plants' leaves and into the pots. The compost tea serves the dual purpose of acting as a foliar rinse and a fertilizer. The beneficial microbes in the tea strengthen the plant, positioning it to better resist diseases and pests. The tea also adds nutrients to the pot, bringing dead soil back to life.


My plants now look so healthy and shiny and new. Though the task of showering them was a bit painstaking, I don't imagine that the process will have to happen more than once or twice a year. Of course, I will probably repeat the compost tea every few weeks, because it's so beneficial. It doesn't take much vermicompost to make the tea – only about a quart per five gallons of water -- and it's fairly easy to make. The benefits are definitely worth the trouble if you want happy house plants!

Wednesday, February 2, 2011

A Little Bit of Good News About a Lot of Snow

By now most of us are channeling our way through mountains of snow following snowmageddon (I’m taking a short break to warm my frozen hands after shoveling for two hours this morning). Building up so much snow against our bungalow caused me to return to a question I have every time we get dumped on like this by Mother Nature: do the heavy banks of snow against a house's foundation act as a kind of insulation, helping to retain heat? Or does the snow act more like ice in a cooler, chilling the house?


I'm inclined to believe the snow insulates more than it chills. It's tough to find a very scientific answer to my question, but these two blog write-ups on the subject seem logical enough: "Using Snow to Insulate Your House" at self-reliance-works.com and "It's cold! What difference does snow make?" from scienceandsarcasm.com. The conclusion is that snow does have an insulating quality, though I would suspect it's minimal -- foundation snow berms and a little roof top snow help, perhaps, but unless our homes are totally buried they're not insulated all that much.

That said, I haven't found a source yet that says snow chills a house. So keep shoveling! There's nowhere else for this much snow to go anyway, other than against our homes. Hopefully it's helping to keep our houses a tiny bit more insulated so that when we return inside from shoveling, we're a little warmer.

Friday, January 28, 2011

Read This Before You Buy Grow Lights

As you may recall, I started Master Gardener training this January through the University of Wisconsin Extension. I'm learning so much each week. For example, did you know that poinsettia leaves are NOT poisonous? Our fantastic instructor, UW-EX Consumer Horticulture Agent Sharon Morrissey, said one of her professors in college demonstrated this fact by consuming poinsettia leaves in front of his students. I also learned that those who grow seedlings indoors need not invest in fancy "grow lights," which frequently cost two or three times more than other fluorescent lights. In order to grow, plants need "red" and "blue" light – that is, bulbs that emit these kinds of rays (not colored red or blue lights but white lights that are tinged with these parts of the light spectrum). To accomplish this with a two-light ballast, you could use one cool-white bulb, which emits blue-tinged light, and one soft-white bulb, which emits red-tinged light.

As soon as I learned this I went straight to the hardware store and bought a 48", two-bulb shop light ballast for $15 and four 48", T8 bulbs – two cool white and two soft white. Each two pack was about $5. I am going to hang the new light behind my other shop light, under which I'm currently growing lettuce seeds. The first light appears to be working just fine so far, and I've saved a lot of money not purchasing a "real" grow-light system (depending on how elaborate the system they can cost upwards of $100, often far more).

Here's a photo of my basement shop light. Growing underneath are two flats of lettuce atop space-saving mini tables my father-in-law constructed for me. The second shop light will be added after I purchase extra long chains for the ballast so I can bring the bulbs closer to the flats (the chains that came with the shop light are much too short).


By the way, you don't have to wait until early spring to start seeds. I'm growing lettuce in my basement under lights. These "Pablo" lettuce seeds I received courtesy of Seed Savers Exchange and planted on January 15 seem to be doing well!

Wednesday, January 19, 2011

Hom Energy Inspection: Part Three

As you may recall from previous Blue Bungalow blog posts, we had a home energy inspection in late 2010, conducted by Tim Guillama of Beyond Energy, LLC. A house is inspected to determine how much conditioned air is typically cycled through in an hour. A draftier home will have a higher "air change rate" than a well-sealed home and, thus, higher heating and cooling bills. When our home was inspected this December, Tim determined that our air change rate was about 13.8 per hour.

Following the inspection, Tim suggested that we have our house and attic insulated. We couldn't afford to do it all at once, so we decided to start by sealing and insulating our attic and basement. We also had our old house exhaust fan replaced with a more energy efficient model. After we had this work done by Insulation Technologies in Milwaukee, Tim returned to our house and again conducted his blower door test to determine the air change rate. It improved from 13.8 changes per hour to about 10.

Our latest WE bill arrived one day after Tim's second inspection, on Tuesday, Jan. 12. The bad news is that gas prices are on the rise again, and this was reflected in our bill. The good news is that the amount of therms we used last month went down from last year, from 761 to 665 (the average temp was one degree warmer this year, which may account slightly for the decrease in therm usage – it went from 23 degrees F last year to 24 this year).

I'm also pleased that our overall energy usage is much lower than average, as evidenced by the following graphic provided by WE:


All in all I'm very happy that we're bringing our therm usage down as prices are rising. We'll still probably pay a great deal to heat our once-drafty old bungalow, but perhaps not as much as we might have.

Much of our home energy efficiency endeavors were made possible by our friend Mike Arney, who is quietly and ardently working to inspire Tosans to go green. He has helped us and he can help you, too: get involved with the new Green Neighbor program (the brain child of Mike Arney and John Bahr). Click on the Green Neighbor checklist to learn about measures you can take to make your home more energy efficient.

There are still several things, both large and small, that we'd like to do to reduce energy consumption in our household. I plan to write about them here – stay tuned.

What measures have you taken to green your home?

Monday, January 10, 2011

The Blue Bungalow at Wauwatosa Now

In case you weren't aware, last week I began posting this blog on the local My Community Now website, Wauwatosa Now, which is owned by the same company that owns the Milwaukee Journal Sentinel. I will continue to post the same content at both blogs. To view the other location, go to www.wauwatosanow.com.

Recycling the Christmas Tree

By now most Tosans' Christmas trees are curbside as we await this week's garbage pick-up, when, on our scheduled garbage day, the trees will be hauled away and turned into mulch. In the past I have pruned off the branches of my Christmas trees and saved them for mulching and composting. This year I was busy, so I decided simply to send our dried up balsam fir to the city. My husband dragged the tree out to the curb last weekend.


I soon began to regret this decision – especially after I came across this list of monthly gardening tips at the Hawks Nursery website. Hawks reminded me not to give up those precious evergreen boughs, as they are very useful in the garden. Thankfully, I found a bit of time to drag the tree to my blueberry patch, where, wearing heavy duty gloves, I cut it to shreds with garden pruners. I then spread the needles around the shrubs, where they will serve as mulch and, hopefully, acidify the soil a bit -- blueberries love acidic soil, and pine is a mild acidifier.


When I got most of the needles off the tree, I replaced what was left of the tree on the curb. (Note: I learned the hard way not to save the trunk and branches as firewood: pine sap tends to explode when heated, which can be dangerous and destructive).


I admit it feels a bit weird to hack apart a Christmas tree. The skeleton that now remains on my curbside is undoubtedly going to make some passersby wonder what the heck we Zydeks do in our house during the Christmas season. On the other hand, recycling my tree is such a beautiful way to continue celebrating Christmas long after December 25 -- that evergreen tree symbolizing eternal life will now also symbolize resurrection as breaks down in the soil, giving new life to other plants.

It's not too late to recycle your tree! Pull it off the curb, clip off the boughs and place them on your garden beds as mulch. Or, save the clippings in a bag and let them age, spreading them as needed during warmer weather or adding them to your compost bin.

Tuesday, January 4, 2011

Question about Home Inspections

This morning I want to share a question from a friend in Tosa re: home inspection and insulation, as it's something I am frequently asked:

Heather,
We're looking into the whole home inspection thing because like you, we have a drafty old bungalow and are paying out the ears each month. I was wondering how much your assessment cost? Did you do the blanket assessment or did you pick & choose individual testing to be done? Was it a lot of do the air seal and insulation? And you said that there is a marked difference?
Karri


Karri,
I think the inspection cost around $300. Generally they run from $300 to $500, depending on the size of one's home. We did the whole assessment, for which the inspector looked at the home's air flow as it relates to heating and cooling. FYI, the inspector doesn't look at, say, lighting, or water usage, or appliances. These are things a consumer can easily assess on one's own. Air flow is much harder for a consumer to assess, and it's important to assess, as heating and cooling account for a majority of a home's energy usage -- which can be A LOT if one lives in a drafty old bungalow. Our first February in Wisconsin the We bill blew my mind. I could simply did not expect to pay $400 or $500 a month on energy each winter when I had been paying closer to $200 a month in Urbana, Illinois.

BTW, the company that inspected our home is Beyond Energy, llc. You might want to contact your neighborhood association to find out if any of your neighbors are interested in getting an assessment. Many energy inspectors offer group rates.

Following the inspection we had our attic air sealed and insulated. We also insulated our basement. The cost was about $3,500 – this is a significant expense for us, but we felt the cost is worth it for the following reasons, in no particular order: (1) improving the comfort level of our home (2) saving money (in the long run) (3) preserving energy and protecting the environment, and (4) preserving an old home while bringing it up to twenty-first century standards. I haven't seen a full month's We Energies bill since we had the work done, so it's too early to analyze cost savings, but the house does feel warmer. Based on estimated savings, my husband figures it'll take us about five years to recoup inspection and insulation expenses.

We were pretty happy with the company who did the work: Intech, located in Milwaukee. They've specialized in home insulation for decades and have had thousands of happy insulation customers, so we knew we were in good hands. They also offered us the most attractive price. The were pleasant and professional, didn't use sub-contractors, and completed the work in one day.

Heather